
Replacing the iPhone 7 battery with your own hands is possible if you have experience and tools. Of course, you still need to buy an iPhone 7 battery. If all of the above is available, then replacing the battery will not take much time.
Thus, you can save time and money. After all, when you need to replace the battery for iPhone 7, the price can vary greatly. However, if there is no experience, it is better not to try to open the smartphone yourself. And also change the battery.
This can lead to serious breakdowns. As a result, the smartphone may stop working. As a result, the amount of iPhone 7 repairs may increase significantly. Therefore, soberly assess your capabilities before deciding to repair your smartphone.
Replacing the iPhone 7 battery with your own hands
iPhone 7 repair should begin with the preparation of tools. And also with the purchase of a high-quality original battery. To replace the battery on an iPhone 7, you will need:
- A Pentalobe PL1 screwdriver;
- Hair dryer, heat gun, hair dryer soldering iron;
- Suction cup for the screen;
- Flat plastic pick for opening the case;
- Screwdrivers (cross, flat, hex);
- Dry and clean container for screws and small parts.
It should be noted that the battery capacity of the iPhone 7 is 1960 mAh. However, if we are talking about the iPhone 7 Plus model, the battery capacity is 2900 mAh. These data should be taken into account when buying a battery for iPhone 7.
Replacing the iPhone 7 battery – disassembling the smartphone
To protect the device from a short circuit during repair, it should first be completely turned off. Press the sleep/wake button until the “Turn Off” slider appears on the display. Move the slider from left to right.
Please note that the iPhone 7 will turn off completely after about ten seconds. Then you can start removing the back cover. Use a Pentalobe screwdriver to remove the two Pentalobe screws. They are located to the left and right of the Lightning connector.
Replacing the battery on iPhone 7 – removing the screen
The iPhone 7 model opens from the display side. It is firmly glued to the rest of the case and must be warmed up before opening. First, place the iPhone 7 on a clean, soft surface. First of all, to protect the back cover from scratches.
Use a heat gun or a conventional hair dryer to gently warm up the screen. This is necessary in order to warm up the glue. This stage must be carried out as accurately as possible. Do not overheat your smartphone.
As a rule, heat the device just enough so that it does not burn your fingers. If you have no experience, then it’s better to find out how much it costs to replace the battery on an iPhone 7. Maybe it’s not worth the risk. It is better to entrust this process to specialists.
Remember that after opening the iPhone 7, the warranty is canceled. Including a guarantee for protection from dust and splashes, as well as for water resistance. As soon as the edge of the display is well heated, you can place the suction cup on the display at the height of the Home button.
Pull the suction cup up. To create a narrow gap between the aluminum frame and the display. At the same time, insert a flat, stable tool into the resulting gap. For this purpose, a hard plastic plectrum is often used.
Battery Replacement for iPhone 7 – iPhone 7 Screen Separation
Try to increase the gap by pressing on the aluminum frame. Be careful not to insert the picks too far to the side of the sleep/wake button. In order not to damage the flexible display cable. Now swipe the pick around the display once.
Then slightly lift the display of the iPhone 7. So that the edges come off the aluminum frame. Keep heating the edge of the display. Leave individual flat rivets in the frame. So that the glue does not stick in the already detached places.
Do not place the display horizontally. Otherwise, flexible cables can easily stretch. It is recommended to lean the display against a stable object. When the display is completely disconnected, you can gently open it in the direction of the sleep/wake button.
Battery connector
Loosen the battery connector at the beginning of the repair. This will help prevent a possible short circuit. And also ensures that you don’t accidentally turn on your iPhone 7 while working. Use a Y-shaped screwdriver to loosen the four Y-shaped screws.
And then remove the bracket above the battery connector. When disconnecting the battery connector, start from the side where there are no small components on the board. So avoid possible damage.
Now move the plastic lever tool under the open battery connector and carefully remove it. To do this, we use a plastic spatula. Now you can proceed to the next stage of replacing the iPhone 7 battery.
Disconnecting the display connectors
When disconnecting the connectors of the iPhone 7 display, you should be careful. Position the lever on the side where there are no small components on the board. So avoid possible damage. Now, in the same way, separate the two display connectors using a plastic spatula.
Disconnecting the FaceTime connector
At the first stage, unscrew the two cross-slot screws that fix the bar above the FaceTime connector and remove it. To do this, you may need an iPhone 7 battery replacement kit.
When disconnecting the FaceTime connector, start on the side where there are no small components on the board. Next, carefully separate the FaceTime connector from the motherboard using a plastic spatula. Remove the display completely and set it aside.
Removing the Taptic Engine and battery
Unscrew the two screws from the plastic cover and remove it. When disconnecting the connectors, the lever is on the side where there are no small components on the board. Now disconnect the Taptic Engine connector. Use a plastic spatula.
Then remove the three screws that attach the Taptic Engine to the back cover of the iPhone 7 and remove it. Removing the battery is performed as well as replacing the iPhone battery with your own hands. The algorithm is the same.
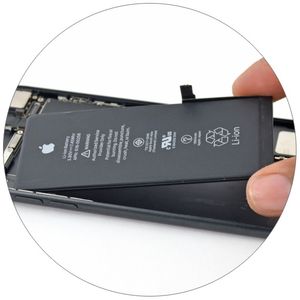
iPhone 7 battery is fixed to the back cover with two adhesive strips. The white adhesive sections of the tapes are located under the black protrusions glued to the bottom edge of the battery. By the way, the iPhone 7 is assembled in reverse order after replacing the battery.
Use tweezers to remove the black protrusions from the edge of the battery. Hold the adhesive strips as straight as possible when pulling them out. They didn’t break the stacks. Also hold the iPhone 7 battery tightly when you pull out the last piece of tape.
So that the battery does not fall out of the device. Slowly pull the tapes out from under the battery. If one of the tapes breaks, you will need to carefully pull out the battery using a wide blade. Try to bend the battery as little as possible.
iPhone 7 Battery Replacement – Completion
When all the adhesive strips come off, you can remove the battery. The adhesive strips must be properly aligned. Check the alignment by placing adhesive strips in the iPhone 7 beforehand.
Remove the large blue protective film from the adhesive strips. Place them in the center of the bottom of the new battery with the adhesive side down. Turn the battery over and remove the small blue protective film from the adhesive tabs.
Press firmly on the ledges on the edge of the battery and turn the battery over again. Now remove the remaining protective film from the adhesive strips. Insert the battery back into the back of the iPhone 7 case.
Position the battery so that it protrudes slightly outside the frame on all sides. Return the Taptic Engine to its original position between the battery and the Lightning connector. Fix the Taptic Engine with three screws, then assemble the iPhone 7 in reverse order.


