
How to replace the screen on an Asus laptop? Without a screen, a computer, both desktop and laptop, is useless. You can’t access content online or work without being able to see what you’re doing.
Since an unpleasant event can happen at any moment, it is better to know how to do it. Consider how to change the laptop screen with your own hands. And also, what do you need to know about replacing the screen with Asus? Immediately note that this process is not simple.
How to replace the screen on an Asus laptop?
First of all, you need to understand what is the difference between a touch screen and an LCD screen. Today, touch screens are used everywhere. They are present in the phone, tablets, laptops and household appliances.
For example, in refrigerators. In fact, the touch screen allows you to interact directly with the display. Using a finger or stylus instead of a mouse, keyboard, or touchpad.
When the touch screen breaks, the device can continue to work. The touch screen (aka digitizer) is a thin transparent layer. Which reads (“digitizes”) the signal (touch).
And provides the information needed by the processor to execute your command. The touch screen and the LCD screen are two separate parts. Firstly, the touch screen may break. And the LCD screen behind it will still function.
The LCD screen displays the image, and when it is broken, you can still use the touch screen. But there will be dark spots or cracks on the panel. Or both. If both are damaged, you can still see parts of the image.
And the touch screen may work partially. But the Asus laptop doesn’t work anymore. Although you can use your laptop with an external monitor. Which, of course, is not convenient. But this may be a temporary solution.
Frequent problems with LCD screens
Next, let’s look at how to replace the screen of an Asus laptop. In the meantime, let’s find out the potential problems you may encounter:
- There is no picture;
- The screen goes off after a short time;
- The monitor is very dark and hard to see;
- LCD screen white without image;
- The screen displays one line or several colored vertical lines, which should not be there;
- The screen turns on for a long time;
- The screen displays “No signal”.
Below we will look at the components that make up the laptop screen. And how they relate to these issues.
What causes problems with the Asus screen?
First of all, the Asus power supply. Firstly, information on how to replace the screen on an Asus laptop often implies a failure of the LCD screen. But, there are cases when the Asus monitor has nothing to do with it.
You should know that the reason may be in nutrition. The power supply unit is responsible for supplying electric current to each component of the laptop’s LCD screen. Any problem with the power supply can damage the device as well as the screen.
Next, if the screen does not work on the Asus laptop, then check the backlight. The backlight provides light passing through the LCD crystals. When the backlight is damaged, the Asus screen will be dark or faded.
You may be able to improve the image by increasing the brightness to the maximum. But repairs will be required. If the screen brightness does not change on an Asus laptop, then the reason may lie in the burning of the backlight lamps.
Asus inverter and controller board
The inverter board is usually located on the underside of the Asus screen. The inverter provides power to the screen backlight module. It also monitors the stability and operation of the LEDs.
If the inverter is faulty and cannot provide the required current and voltage for the backlight, this will affect the brightness of the screen. The controller board/card not only decodes the signal from the video card. But also controls the inverter, power supply and LCD screen.
Asus Screen – How to replace the screen on an Asus laptop
The Asus screen is subject to many different problems. From physical damage to faulty pixels. Often physical damage to the screen is visible to the naked eye. But there may be cases when the crack is imperceptible.
How to replace the screen on an Asus laptop
The first tip is to work methodically and patiently. For those who do this on a regular basis, this is a fairly simple and fast process. First of all, you need to have a clean and well-lit workplace.
If it is inconvenient to disassemble the device or replace the screen, contact an ASUS certified professional repair shop. Most repair shops will ask you to purchase screen parts.
Follow the 5 steps below to successfully replace the screen on an Asus laptop. The instructions below are intended as a general guide. For example, the mentioned screws may be located elsewhere on your particular laptop.
Damage assessment
Does the Asus laptop turn on successfully? Then we recommend connecting the laptop to an external monitor. You may have to go to “Settings” or use some function keys to recognize the external display.
If the external monitor is working correctly, you can conclude that the problem is related to the laptop screen or the EDP/LVDS cable. Next, inspect the Asus laptop for physical damage.
Is the frame around the screen damaged, is the screen itself damaged, is there a point of impact… If the frame has been damaged, you will have to purchase a new frame. Please note that sometimes they are only sold as part of a full screen module.
You should make sure that the hinges are not damaged and are well secured. The cables connecting the LCD display to the motherboard pass through loops. Now find the appropriate Acs screen.
Tools for replacing the Acs screen
You will need several tools to properly install the laptop screen. As well as a clean, flat surface on which to work. Tools:
- A spatula or similar object for removing the screen frame;
- Suitable screwdrivers;
- Wedge for removing the bezel;
- Any small capacity for screws.
How to replace the screen on an Asus laptop – algorithm
First of all, remove the power supplies. To replace the screen, first turn off the Asus laptop. Make sure it is disconnected from the power supply. You should also remove the battery to avoid any other problems.
Remember, do not touch any components without grounding. Static electricity can damage components! There may be screw caps on the front panel of the screen, usually at the bottom of the laptop screen next to the hinges.
Now, carefully remove the stickers and screws. Carefully remove the screw caps using a pin or wedge. Then remove the screws. Do not apply excessive force when unscrewing the screws. Put the stickers and screws in the container.
Removing the front panel of the Acs
Remove the frame with a wedge or spatula. Be very careful if you don’t want to damage the bezel or buy a new one. The wedge is used to lift the faceplate away from the LCD display cover.
At regular intervals there are plastic protrusions that hold the screen and the front panel in place. You will need to make enough effort to separate them.
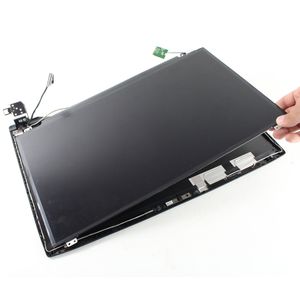
Removing the Asus screen
Now you should have unhindered access to the LCD screen. It will be fixed on the metal frame of the laptop. There will be two screws in the upper corners. You can also find a few more screws securing the LCD display on the sides.
In some cases, you may find a strong tape holding the LCD in place. Carefully remove all fasteners. It is better to put these screws aside separately, so as not to confuse them with those removed earlier.
If you had to remove any glue, you will need to replace it in order to properly install the new screen. Not every glue fits. Remember that some types of glue can damage plastic. Cyanoacrylate super glue is not the best solution.
Now disconnect the cable connectors. Be careful, the Acs screen is still connected to the bottom of the case with an EDP/LVDS cable. You will need to disconnect the cable.
If there is adhesive tape, remove it before disconnecting the connectors. When pulling, apply a straight uniform pressure. Do not twist the loops. Be very careful not to damage the connectors.
Installing the Asus screen
Insert a new screen and assemble in reverse order. Position the new screen horizontally and connect the EDP/LVDS cable. Make sure the connectors are properly aligned.
Attach the new screen with the appropriate screws and glue to hold the LCD in place. Reattach the faceplate. Install the bezel back. Align it so that it is properly fixed in the screen housing.
Tighten the screws and install the stickers. Now insert the battery of the Acs, connect the laptop and start it. Finally, update the BIOS and drivers. It is always recommended to update the BIOS and drivers after installing new hardware.


